Screens for Ren'Py Dummies (me) | Part 2: Making a Screen
Last time on...
In part 1, we learned what a Screen actually is. It's all the user interface elements that go in front of your game. This can be used to show information to the player and allow the player to change the game using input.
Now, it is time to do some coding and learn how to make a screen!!!
The current outline for this series is as follows. This may change as the series goes on:
- What is a Screen?
- Making a Screen (you are here)
- Position
- Anchor
- Position Style Properties
- Containers
- Screen elements. Text. Images, and Everything Else.
- Actions. Buttons. Input.
- Styles.
- Logic. Variables. Python.
- Ren'Py's default UI and why it sucks.
Making a Screen
A note on files
First, a little note on how Ren'Py reads your game files. As described in greater detail in the documentation, Ren'Py reads your files in a certain order. In practice, this means it usually doesn't matter where you write your code because Ren'Py is going to sweep through all your Screens code at once.
For example, you might like to make your own file called my_lovely_screens.rpy where you can practice the example code we'll be going over in a moment. There's nothing stopping you from putting it in script.rpy or screens.rpy other than your own personal preference for organisation.
NOTE:
It usually doesn't matter where you write your code. Organise it however you like.
Defining a screen
In your empty my_lovely_screens.rpy, or wherever you decide to put it, you can begin declaring a screen like this:
screen awesome_info():
- screen - This tells Ren'Py you're making a screen.
- awesome_info - The name of your screen. This must be unique.
- () - These brackets don't do anything right now but in the future, you can put variables inside them.
- : - Indicates the start of a block (keep reading).
A block
If you launch the game right now you'll get a "screen expects a non-empty block" error. This is because we didn't actually put anything in the screen yet. The colon indicates the start of the "block", meaning anything indented under the screen is considered as part of the screen. Pressing the Shift key in your text editor should automatically add 4 spaces to indent your code (and if it doesn't, fix it now).
A block is a very useful concept as we will be putting things inside of other things as we go on.
screen awesome_info():
    ----------------------------------------------------------
    |I am inside the screen.                                 |
    |I am also inside the screen.                            |
    |Why am I called a block?                                |
    |Well, the more code you add, the more prominent the edge|
    |on the left becomes.                                    |
    |Once it gets long enough all this code starts looking   |
    |like a block.                                           |
    |You know like a square-ish thing.                       |
    |It becomes obvious what isn't in the block once it      |
    |exits the indentation because it doesn't line up.       |
    ----------------------------------------------------------
I am OUT of the block meaning I'm not part of the screen.
This is not actual code. BTW if you're on mobile, switch your browser to desktop mode or this is going to look like nonsense.
NOTE:
Whenever someone refers to putting something "inside" of something else in Ren'Py or Python, they are talking about a block.
A colon : represents the start of a block.
Anything indented under that colon is INSIDE the block.
Anything outside the indentation (so it no longer lines up neatly) is OUTSIDE the block.
Adding text inside your screen
Okay let's put something useful inside the screen. We'll start with some simple text.
screen awesome_info():
    text "I'm feeling cute today."
- text - This tells Ren'Py to put some text in your screen.
- "I'm feeling cute today." - Whatever you put in the quotes, or any other Python string, will show up as text.
Showing and hiding your screen
Congratulations, you've completed your first screen. But how do you get it to show up on your... screen?
Similar to images, there's a show screen statement.
show screen awesome_info
And as you'd expect there's the equivalent hide screen statement.
hide screen awesome_info
You can write these in your script the same way you'd do with images.
    e "You've created a new Ren'Py game."
    e "Once you add a story, pictures, and music, you can release it to the world!"
    show screen awesome_info
    e "I bet you can't guess how I'm feeling today."
    e "Go on, have a guess. What do you think?"
    hide screen awesome_info
    e "Wait, you could see that this entire time?!!"
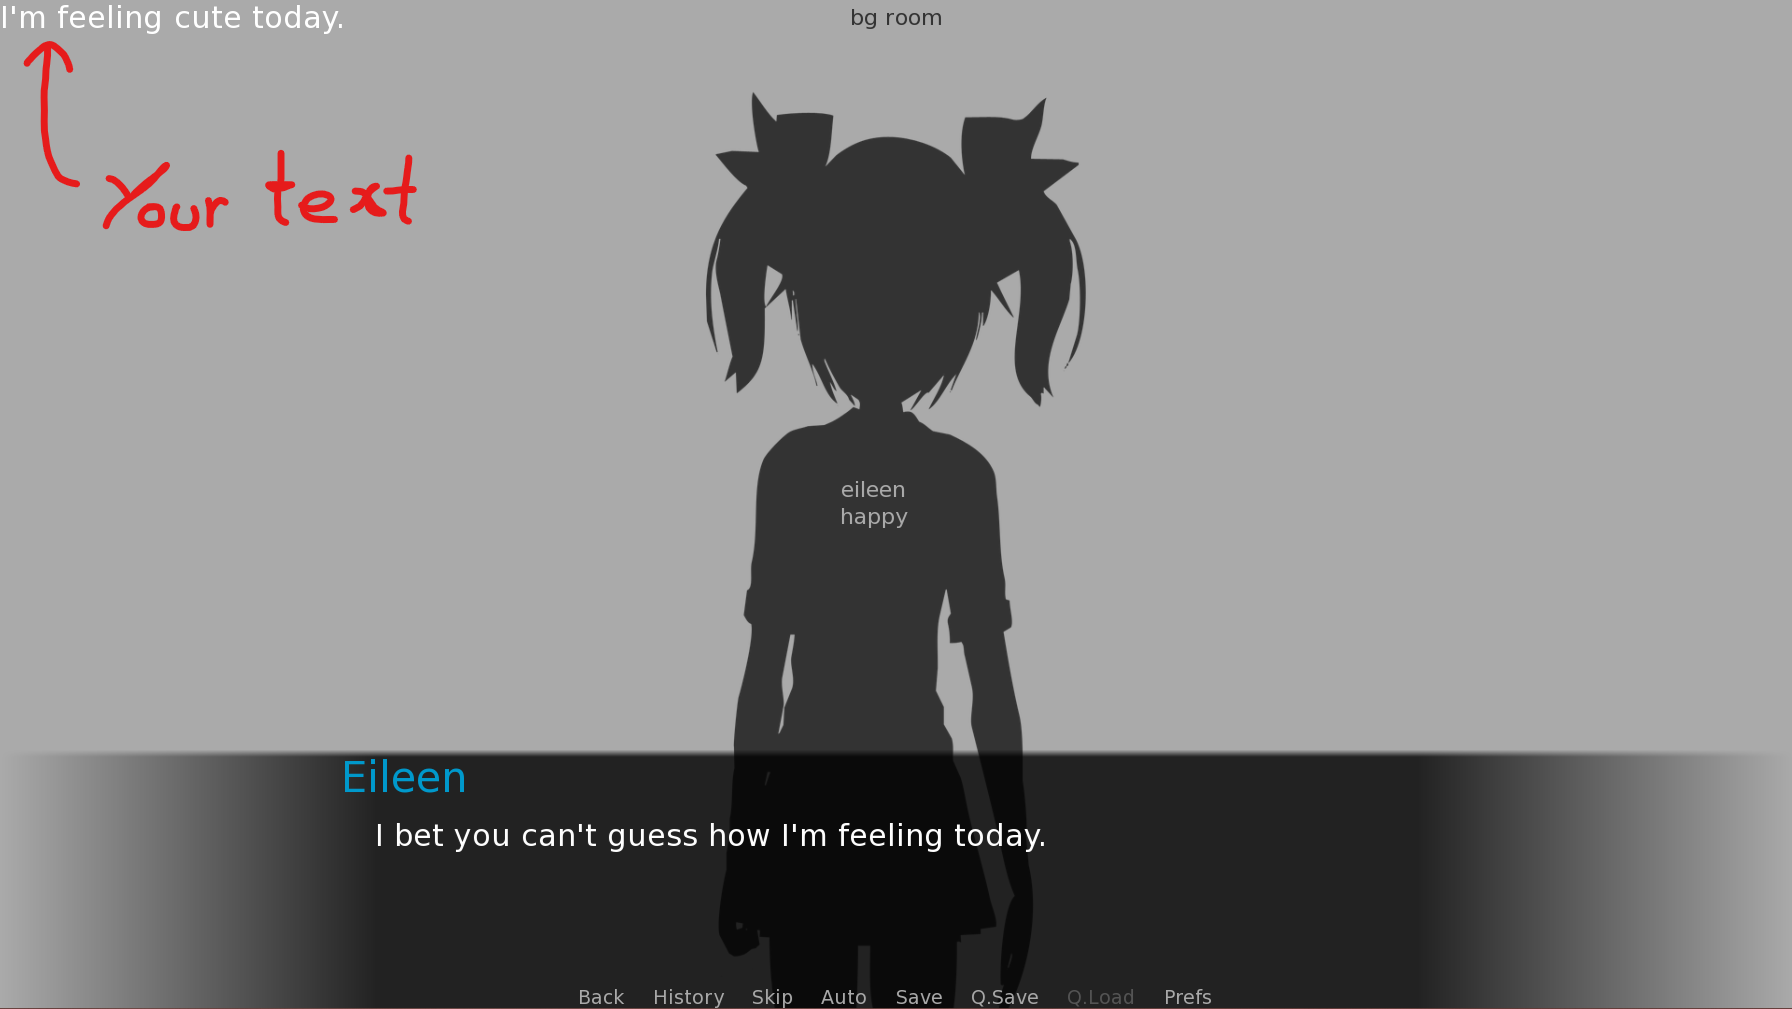
Your screen with text appears in game.
Adding images inside your screen
You've added some text. Now how about some images.
screen awesome_info():
    text "I'm feeling cute today."
    add "cuteshadow.png"
- add - This tells Ren'Py to put an image in your screen.
- "cuteshadow.png" - Your image. This can be a direct file path or any other image name you've already defined.
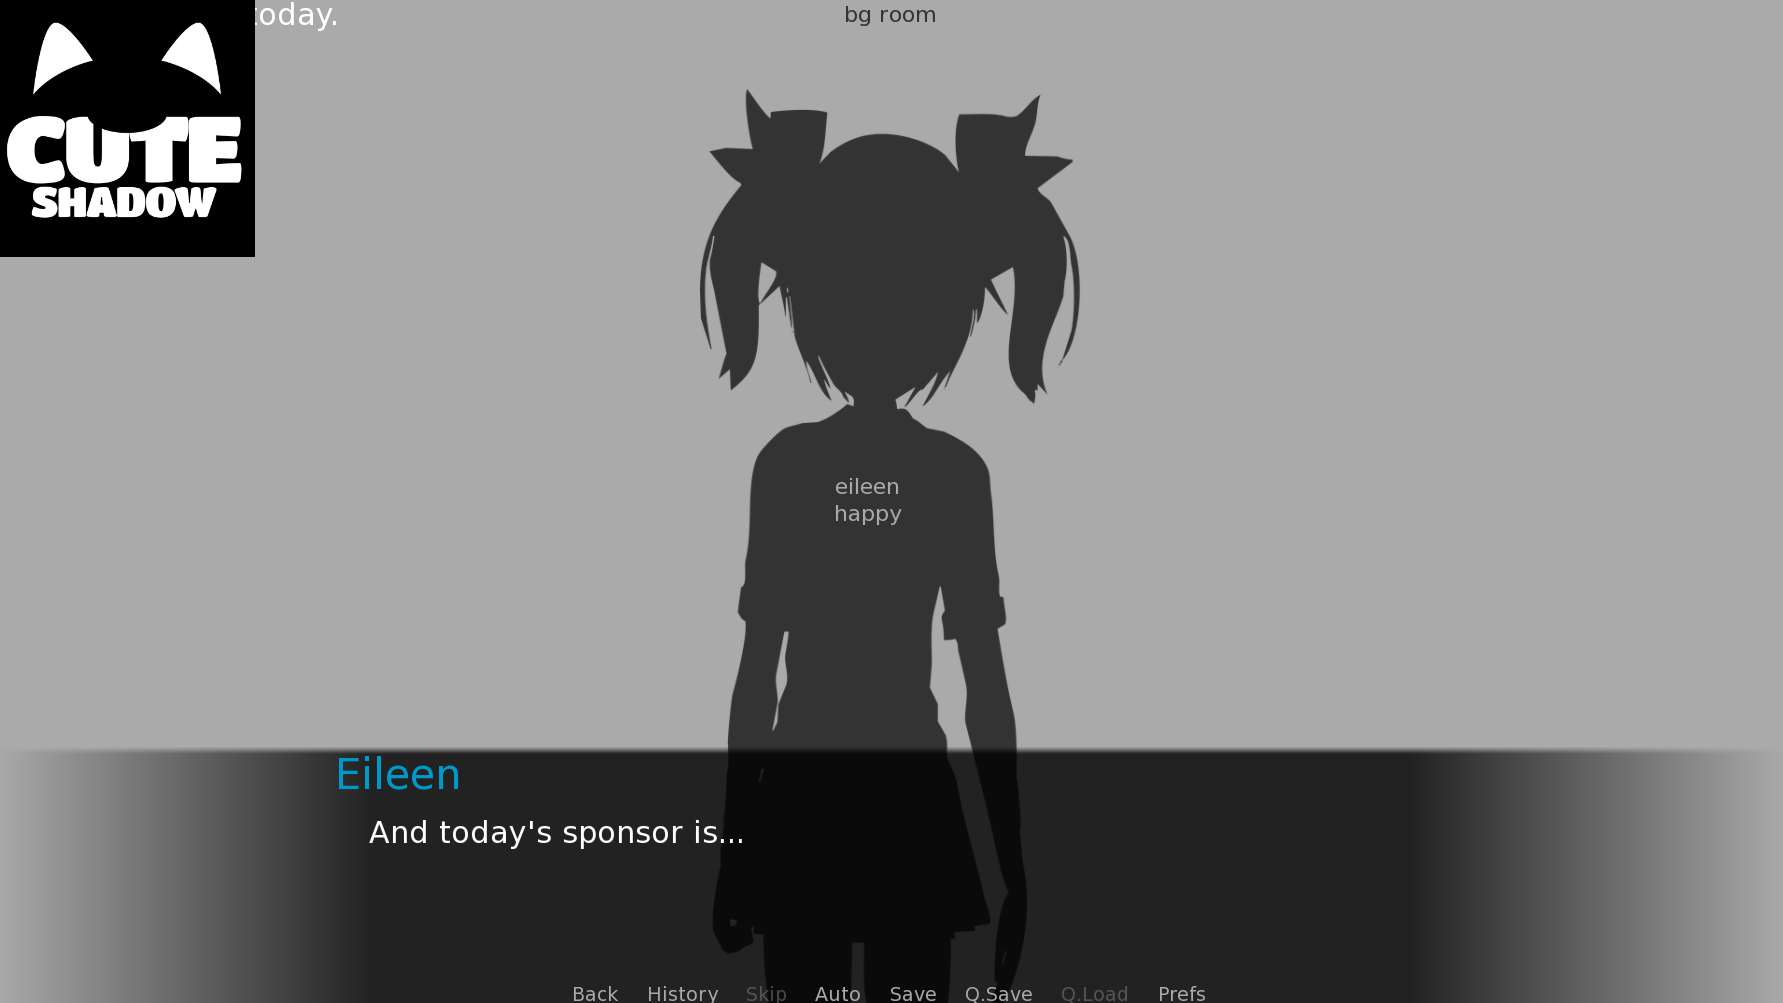
Your screen with your image appears in game.
Changing the drawing order
You might've noticed that everything you put inside the screen is going to the top-left corner. This is the default position but it means your image is covering up your text now.
If you swap the order your things are written in, you can put your text in front of your image.
screen awesome_info():
    add "cuteshadow.png"
    text "I'm feeling cute today."
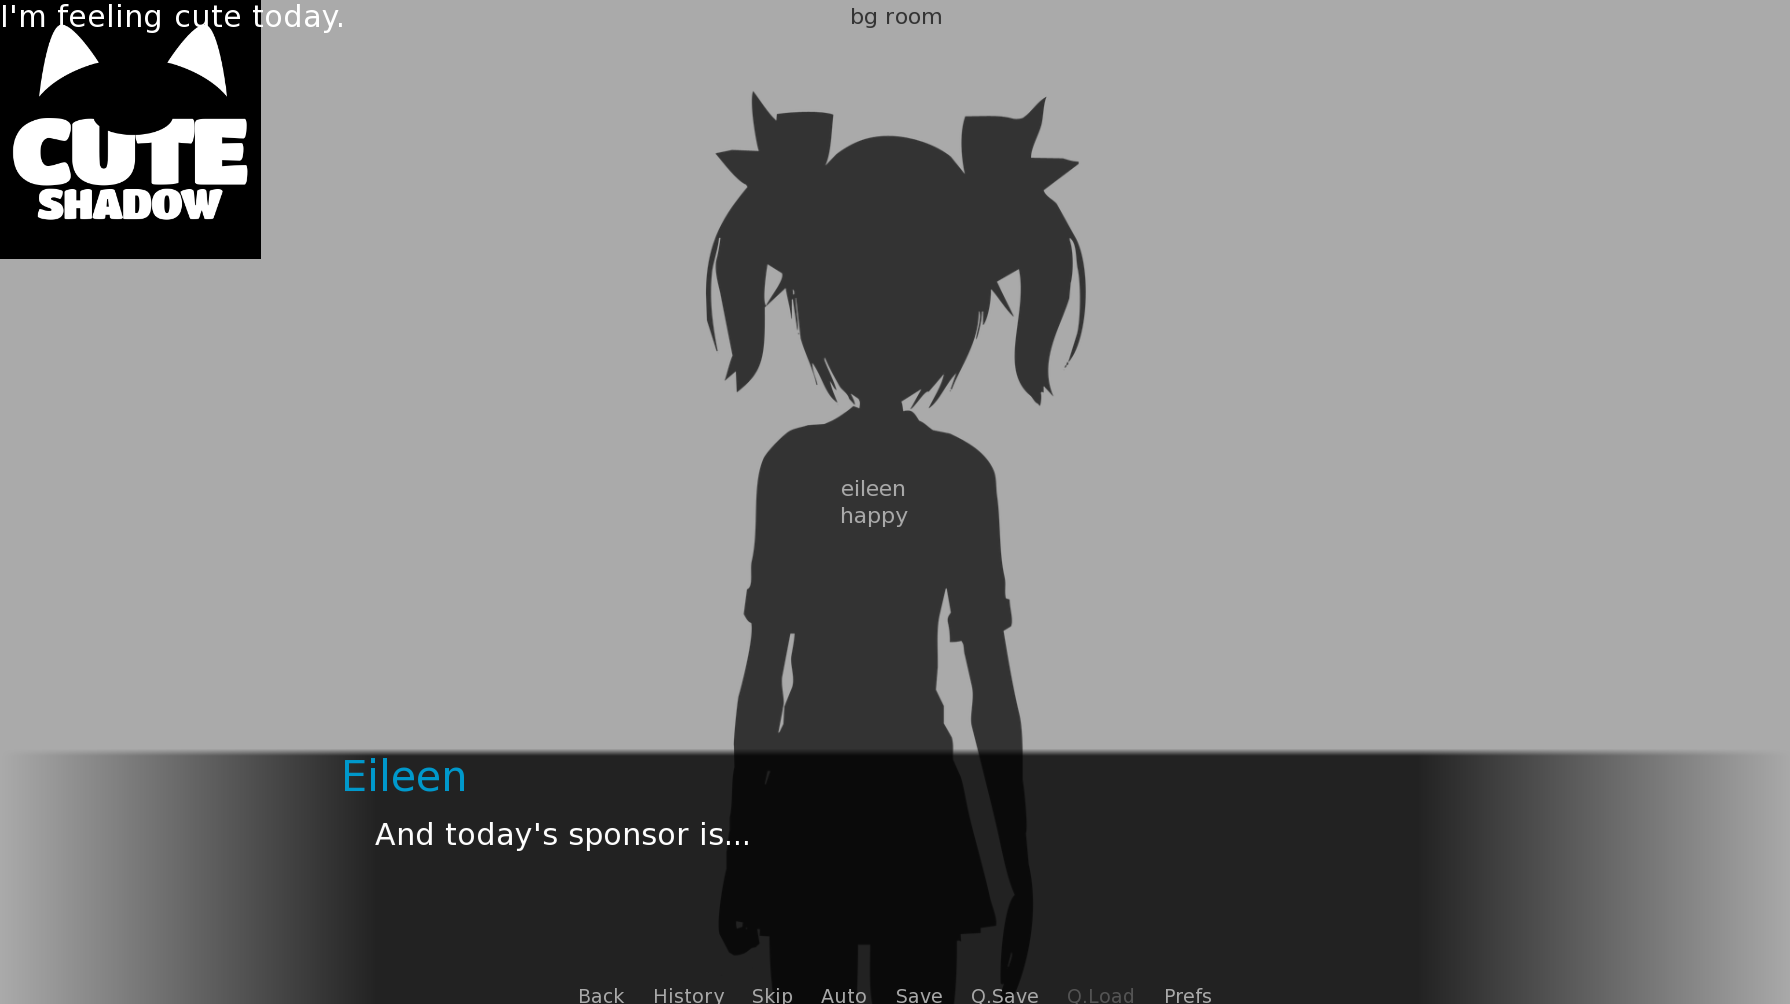
Your text on top of your image because you changed the order they're written in your screen.
NOTE:
The order things show up in your screen is in the same order you code them in. Like layers in an art program.
Conclusion
Yippie! You've created your first screen, then added some text and images, and showed your screen in game.
You even saw what happens when multiple things overlap each other.
SUMMARY:
You can write your screen code in any file you like. Organise it to your preference.
Use text and add to put text and images in your screens.
Use show screen and hide screen to show and hide your screens in game.
Everything you put in your screen defaults to the top-left. The order they are drawn is the same as the order you code them in.
Leave a comment
Log in with itch.io to leave a comment.